FixForge › RV › Propane Regulator Replacement
RV Propane Regulator Replacement
When your stove burns yellow, your oven won't get hot, or the auto-changeover indicator is stuck red, the answer is almost always the regulator. It's a $50 part with a 30-minute replacement procedure. The catch: propane work has zero tolerance for sloppy — do it right or don't do it at all.
Last Updated: May 2026
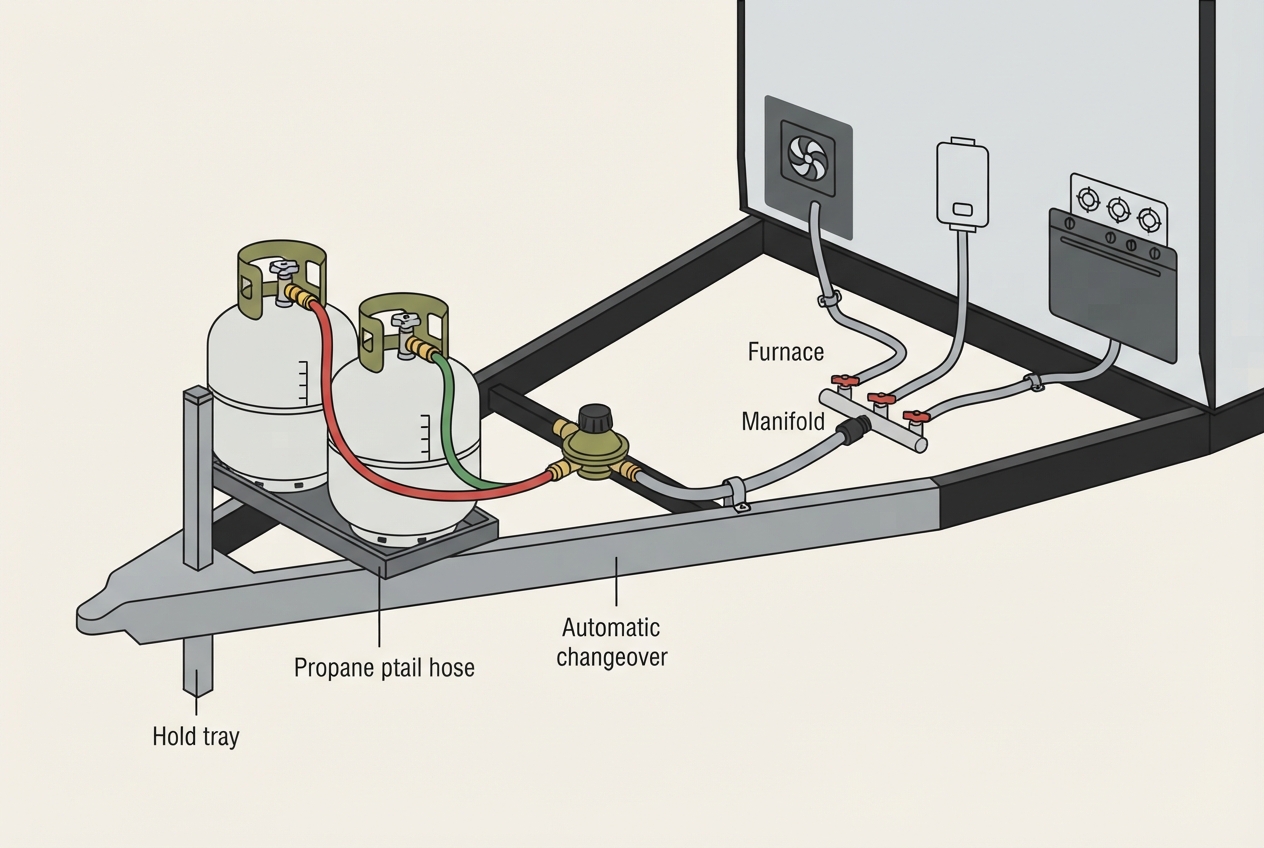
Fast answer if appliances are burning yellow
That's a low-pressure problem 95% of the time, and the regulator is the cause 95% of those. If the RV is older than 10 years and the regulator has never been replaced, it's overdue. Buy a two-stage automatic changeover regulator (Marshall Excelsior MEGR-253 or Cavagna 967 are the standards) for $40-80. Turn off both propane tanks, disconnect the pigtails from the regulator, unscrew the regulator from the high-pressure inlet, install the new one (yellow gas-rated tape on the NPT line connection only — NEVER on the flare pigtail fittings), reconnect tanks, leak-test EVERY joint with soapy water, then test appliances.
Regulators have a 12-year design life. Past 10, replace on any symptom.
Flare & POL fittings seal metal-to-metal — no tape. Only the NPT outlet gets yellow gas-rated tape (never white).
Soapy water on every connection. Bubbles = leak. No exceptions.
This is how RVs catch fire. Soap or electronic detector only.
Why this part fails the way it does
An RV two-stage regulator does two jobs simultaneously. First stage: drop tank pressure (which varies from 100-200+ PSI depending on temperature) down to roughly 10 PSI. Second stage: drop that 10 PSI down to the precise 11 inches of water column (about 0.4 PSI) that appliances are designed to receive. Both stages use rubber diaphragms that respond to pressure differential and modulate flow.
The rubber diaphragms harden with age, ozone exposure, and thermal cycling. As they harden, they respond more sluggishly to demand changes and eventually develop pinhole leaks. The failure mode is gradual rather than sudden — you don't lose all pressure overnight; you lose 10% one year, then 20% the next, until appliances stop performing. By the time symptoms are noticeable, the regulator has been underperforming for months.
The 12-year design life is conservative but real. Coastal climates with high humidity and ozone accelerate failure. Storage in direct sun accelerates failure. Some RVers see regulators fail at 8 years; almost no one sees them last past 15.
How to actually diagnose — don't guess
The cheap diagnostic is a manometer (water column gauge) connected to a stove or oven gas line via a T-fitting or pressure tap. Properly working regulator reads 11 inches water column with no appliances running and holds 9-10 inches under load (one burner + oven). Reading below 9 in WC under load is a failing regulator.
If you don't own a manometer, the symptomatic diagnosis works on a process of elimination:
- Try a different tank. If the new tank works fine, the original tank's valve or pigtail is the problem — not the regulator.
- Disconnect appliances one at a time. If problem persists with everything off but lighting one burner, the regulator can't even sustain a single burner — that's a failed regulator.
- Listen at the regulator. A working regulator is silent. A failing one sometimes makes a faint hissing or pulsing sound under demand.
- Check the auto-changeover. The red indicator means the "primary" tank is empty and the unit has switched to the reserve. If both tanks are full and it's still red, the internal switching mechanism has failed — replace the regulator.
The replacement procedure
- Turn OFF both propane tanks at the tank valves. Fully closed, all the way. Then open a burner inside the RV briefly to bleed off any line pressure. Close the burner.
- Disconnect the pigtails. Use an adjustable wrench, and know the two ends are different: the tank end is a POL (CGA-510) fitting with left-hand thread — turn it clockwise to loosen — while the regulator end is a 1/4" inverted flare with standard right-hand thread (counter-clockwise to loosen). If a fitting is seized, soak with penetrating oil rather than forcing it.
- Unscrew the regulator from the high-pressure inlet line (the rigid line that runs into the RV). This is standard right-hand thread. Use two wrenches — one to hold the inlet line, one to turn the regulator — so you don't twist the line itself, which can damage downstream connections.
- Inspect the new regulator. Confirm it matches the orientation of the old one (inlet direction, vent direction, mounting points). The vent must point DOWN when installed — if it points up, water can collect and freeze, blocking the vent.
- Seal ONLY the NPT pipe-thread connection — never the flare fittings. The two pigtail connections to the regulator are 1/4" inverted flare fittings: they seal metal-to-metal and must NOT get thread tape or pipe dope. Tape on a flare actually prevents a proper seal and can cause a leak. Only the regulator's 3/8" NPT outlet, where it threads onto the RV's rigid gas line, gets sealant — use yellow gas-rated tape (4-6 turns, wrapped clockwise) or an approved gas-rated pipe sealant, never white plumbing tape. Rule of thumb: flare and POL fittings get nothing; tapered pipe thread (NPT) gets tape.
- Install the new regulator onto the high-pressure inlet line. Hand-tight first, then snug with the wrench. Don't overtighten — tight enough that the connection is firm, not so tight that you strip threads.
- Reconnect the pigtails. Remember these are left-hand thread on the tank end.
- Open ONE tank valve slowly while listening for hissing. No hiss = good. If you hear a hiss, close immediately and check connections.
- Leak-test EVERY joint with soapy water. Mix dish soap with water (50/50) in a small spray bottle. Spray every connection. Watch for bubbles. ANY bubble forming = a leak. Tighten and retest. Do this with each tank individually, then with both tanks open.
- Once all joints are confirmed leak-free, light one appliance. Should burn blue and steady. If you've solved the original symptom (yellow flames, weak heat), you've fixed the right thing.
2026 cost reference
| Item | Typical 2026 cost | Notes |
|---|---|---|
| Two-stage auto-changeover regulator (Marshall Excelsior MEGR-253) | $45-70 | Industry standard. Solid choice. |
| Two-stage auto-changeover regulator (Cavagna 967) | $40-60 | European-made, equivalent quality. |
| Single-stage regulator (for portable BBQ etc.) | $15-30 | NOT for the RV main line. Different application. |
| Yellow gas-rated thread tape | $4-8 | Must be propane/gas-rated. White plumbing tape can fail. |
| Manometer / pressure gauge with appliance connector | $30-60 | One-time tool. Lets you diagnose this and every future regulator issue. |
| Pigtail hoses (replacement, sometimes needed alongside regulator) | $15-30 each | Replace if the old ones are cracked or 10+ years old. |
| Service-center regulator replacement (labor only) | $80-180 | Plus the part. Total $130-260 at a shop. |
When to stop and call a pro
Propane work above the regulator (the high-pressure side, between tank and regulator) is fine for DIYers with basic mechanical skills. Propane work below the regulator (between regulator and appliances) gets harder. Specifically: any soft-copper line repair, any modification to the gas manifold, any appliance shutoff valve replacement, and certainly any work involving cutting and re-flaring soft-copper. These require flaring tools, leak-testing protocols, and confidence in your work that the average DIYer doesn't have. The regulator replacement itself is squarely within DIY scope. Anything beyond it, hire a certified propane technician.
POL and ACME inlet. Two-stage.
Check Price on Amazon →As an Amazon Associate, FixForge earns from qualifying purchases.