FixForge › RV › Grey Tank Sensor Stuck Full
RV Grey Tank Sensor Stuck Reading Full
The tank is empty. The monitor says full. Here's what's actually happening, what works, what wastes your time, and what it costs to fix it permanently. Last updated: May 2026.
The fast answer if you're in a hurry
Your sensors are contaminated, not broken. The tank is probably empty. Here's the 80% case:
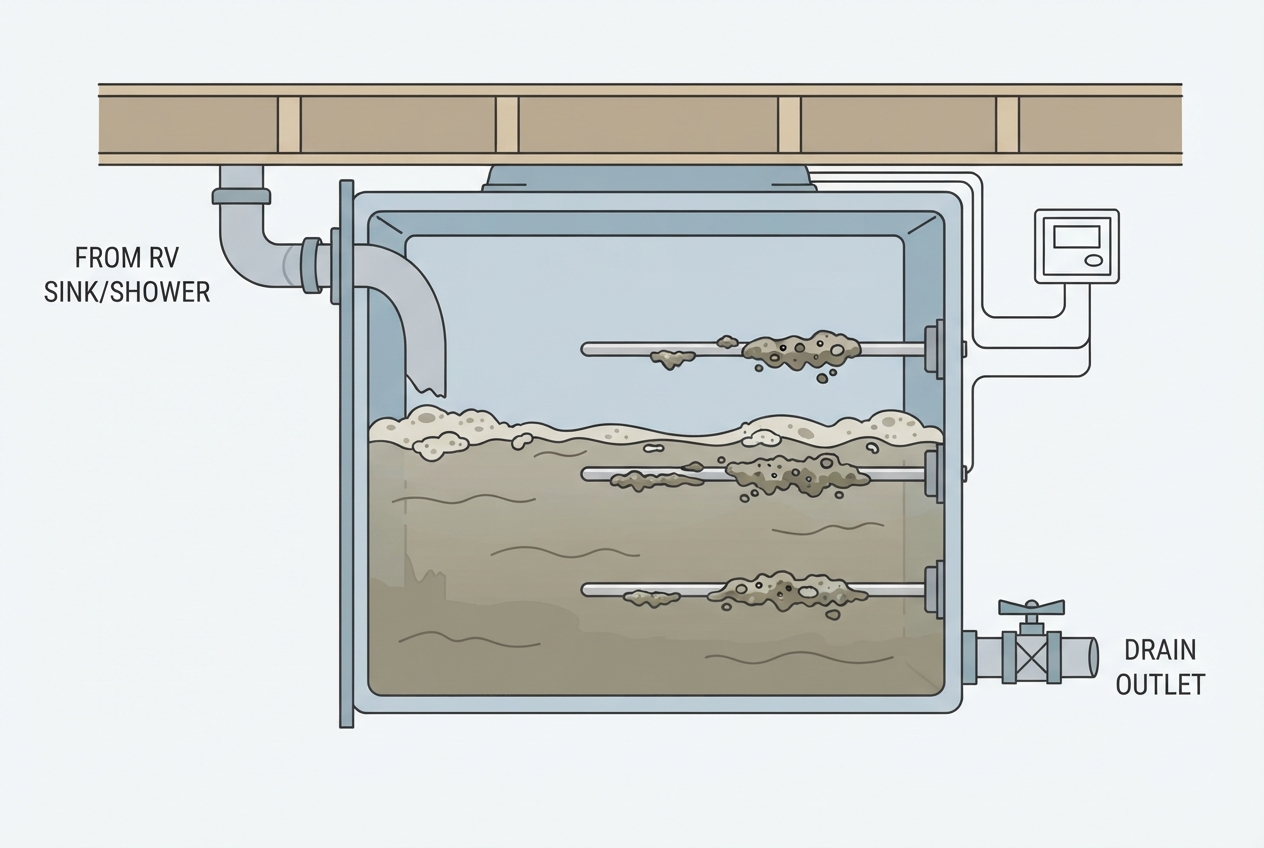
What's actually happening inside your tank
RV grey tank sensors are not high-tech. They're small metal probes — usually three of them at different heights — that pass through the wall of the tank and stick into the inside. The monitor panel measures whether liquid is touching each probe by checking for electrical conductivity. Liquid touches the probe, current flows, monitor reads that level as full. Liquid below the probe, no current, that level reads empty.
The problem: anything conductive stuck on the probe also flows current. Grey water from showers, sinks, and dishwashing contains soap scum, grease, food particles, hair, and toothpaste. Over time these coat the probe and bridge the gap. The monitor reads "full" even when the tank is bone-dry, because the coating itself is conducting electricity between the probe and the tank wall.
This is why dumping doesn't fix it. You're not removing the coating by emptying the tank — the coating is on the probe, not floating in the water.
What actually works (in order of effort)
Method 1: Borax + Calgon flush (works 80% of the time)
- Confirm your tank is empty. Dump it normally first. The borax-Calgon treatment is for cleaning the sensors, not for breaking down solids.
- Add 5-10 gallons of HOT water to the tank. Hot water dissolves grease far better than cold. If your RV water heater is on, run it and pull water through the kitchen sink with the grey tank valve closed.
- Add 1 cup of borax and 1 cup of Calgon water softener. Borax breaks the grease bond. Calgon prevents the dissolved minerals from re-depositing on the probes. Both are available at any grocery store for under $15 combined.
- Drive at least 30 minutes. The agitation matters as much as the chemistry. The solution needs to physically slosh against the sensors to scrub them. A short trip or just sitting overnight doesn't work as well. If you're stationary, fill higher and rock the RV manually.
- Dump and rinse. Empty the tank fully. Rinse with 5 gallons of plain water. Check your monitor reading on a refill.
If the readings go back to accurate, you're done. If they're still stuck at full, the buildup is stubborn — move to Method 2.
Method 2: Detergent boost (for stubborn buildup)
Same procedure as Method 1, but add 1 cup of powdered laundry detergent (Tide, Arm & Hammer, etc.) to the borax-Calgon mix. Do not use dish soap. Dish soap creates massive foam that you'll fight for days. Laundry detergent has surfactants tuned for fabric — they release grease better with less foaming. Run two consecutive flushes a day apart.
Method 3: Tank wand or sprayer (mechanical cleaning)
If chemistry alone won't move the coating, you need physical cleaning. An RV tank wand (Camco Flexible Swivel Stik, ~$25) attaches to a garden hose and sprays high-pressure water inside the tank through the toilet or sewer connection. Spray directly at the sensor locations, which are usually visible from outside the tank (look for the wire connections). 5-10 minutes of focused spraying often dislodges what chemistry alone won't.
Method 4: Ice cube myth (does NOT work, save your time)
You will find dozens of articles and forum posts recommending you put bags of ice into the grey tank and drive around. The theory is that ice scrubs the sensors. In practice it doesn't work — ice floats. It sits at the top of the water in the tank and never touches the lower sensors where the problem actually is. The reason this myth persists is that people doing this also dump first, so they sometimes see correct readings briefly. The borax method does the same thing more reliably.
What it costs in 2026
| Solution | Cost | Notes |
|---|---|---|
| Borax + Calgon flush (DIY) | $8-15 | Works 80% of the time. Start here. |
| RV-formulated tank treatment (Happy Camper, Unique Digest-It) | $15-40 | Works similarly to borax. Marginally more convenient. Higher price for branding. |
| Camco Flexible Swivel Stik (tank wand) | $22-30 | One-time purchase. Reusable. Worth having. |
| Internal sensor replacement (shop labor) | $250-600 | Requires tank access. Usually involves dropping the tank. Rarely worth it. |
| External capacitive sensors (Garnet SeeLevel II, DIY install) | $200-400 | Mount outside the tank. Won't get contaminated. Permanent solution for chronic problems. |
| External sensors with professional install | $350-750 | Add labor to kit cost. Worth it if you're not comfortable wiring. |
Cost reality: most owners spend $15 once or twice a year on the borax flush and never need anything else. The external sensor upgrade is for people whose internal sensors are physically damaged or whose tank has accumulated buildup that chemistry can no longer reach.
When to give up on internal sensors and install external ones
If you've done the borax-Calgon flush three times across three months and the sensors still don't read correctly, the contamination is likely beyond chemical removal. At that point you have three options:
Option 1: Live with it. Track tank levels manually — count days of use, listen for the gurgle when the tank is near full, dump on a schedule. This works for many full-time RVers. The downside is you lose the safety net for emergencies.
Option 2: External capacitive sensors. Systems like Garnet SeeLevel II or Lippert 1-Touch mount strips of capacitive sensors to the OUTSIDE of the tank. They don't touch grey water at all, so they can't be contaminated. Installation involves running new wiring to a new monitor panel inside the coach, but no tank access is needed. Most DIYers can do it in 4-6 hours.
Option 3: Internal sensor replacement. A repair shop drops the tank, replaces the probes, and reinstalls. This is the most expensive option, takes the longest, and the new sensors will eventually get contaminated again. We don't recommend it unless an external system isn't feasible for your build.
Prevention going forward
The cheapest fix is the one you never have to do. Three habits prevent sensor contamination from coming back:
Never leave the tank bone-dry. After every dump, add 2-3 gallons of fresh water back into the tank. This keeps the probes wet and prevents soap residue from drying onto them. Dry residue is much harder to remove than wet residue.
Use enzyme-based tank treatments. Camco TST and Happy Camper both contain enzymes that break down organic matter before it can adhere to surfaces. Add one dose per fresh-water refill. The cost is about $0.50 per dump.
Don't pour grease, oil, paint, or harsh chemicals down the drain. Bacon grease and cooking oil are the worst offenders — they coat the entire tank interior and create a base layer everything else sticks to. Wipe greasy pans with paper towels before washing. Trash, not tank.
Frequently Asked Questions
Why does my grey tank read full when I just dumped it?
Almost always sensor contamination, not actual fullness. The probes inside the tank are coated with soap scum and grease that conducts electricity, making the monitor think there's water touching them.
What product actually works to clean RV grey tank sensors?
Borax + Calgon water softener in hot water, then drive 30 minutes. About $15 total at any grocery store. Works ~80% of the time on first try.
How much does it cost to replace RV grey tank sensors?
Internal sensor replacement at a shop: $250-600. External capacitive sensor kit (DIY install): $200-400. Most owners skip internal repair and go external when chronic problems persist.
Do I really need to fix this or can I ignore it?
You can ignore it short-term, but you lose the ability to monitor actual capacity. Most RVers who ignore it eventually overflow a tank — far worse than just fixing the sensor.
How do I prevent this from happening again?
Always leave 2-3 gallons of water in the tank after dumping. Use enzyme-based tank treatments. Don't pour grease down the drain. Run a borax maintenance flush monthly.
Eliminates probe fouling.
Check Price on Amazon →As an Amazon Associate, FixForge earns from qualifying purchases.