FixForge › RV › Converter vs Inverter Selection
RV Converter vs Inverter: Which You Actually Need
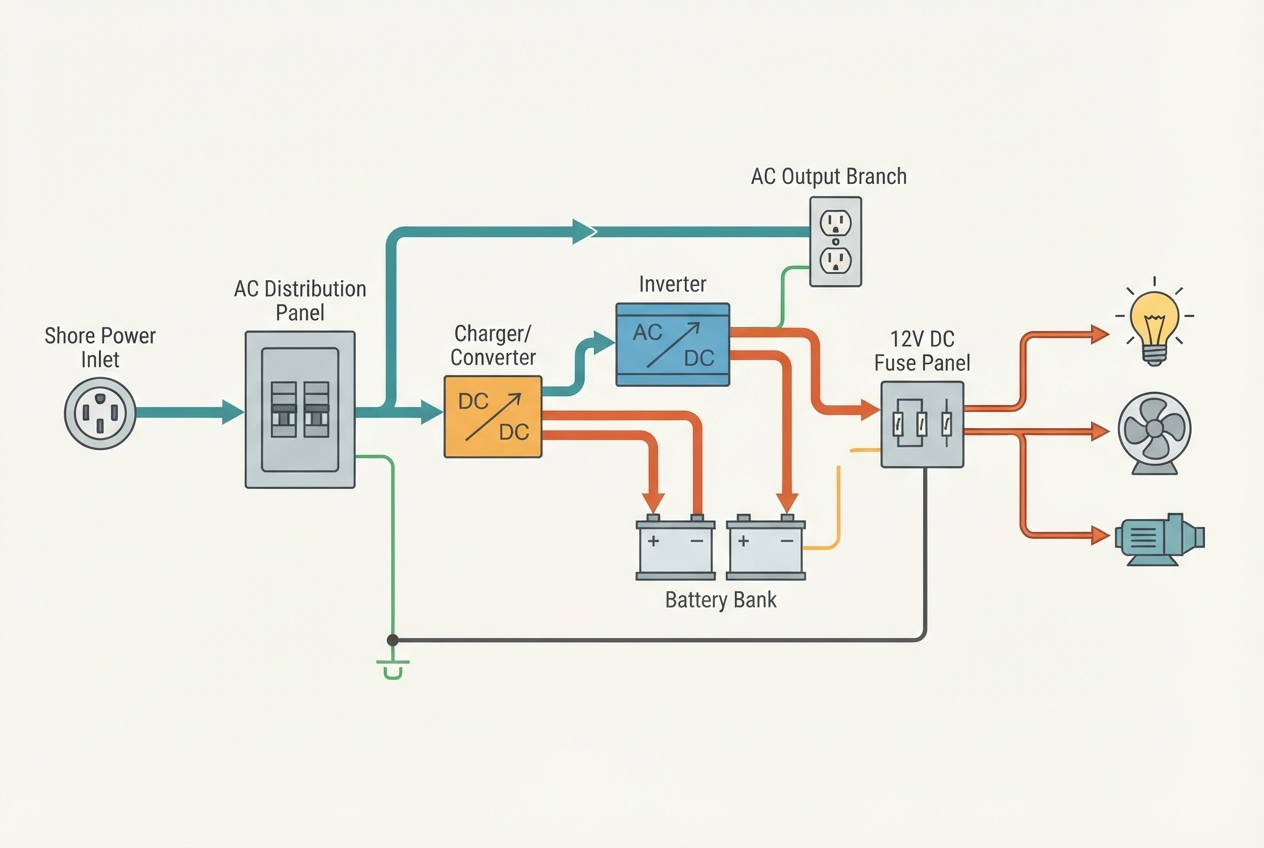
The two words sound similar and confuse first-time RV buyers constantly. They do opposite jobs. A converter sends shore power into your battery. An inverter pulls battery power out for AC devices. You probably need one. You may not need the other.
Last Updated: May 2026
Fast answer for someone choosing today
If you mostly camp at sites with shore power hookups, you need a converter (which you almost certainly already have built into the RV) and probably nothing else. If you want to occasionally use AC-powered devices when off-grid (laptop, CPAP, small TV), add a 1000-1500W pure sine wave inverter for $150-300. If you plan to boondock for days and run a microwave or AC unit off-grid, you're looking at a 3000W+ inverter/charger combo plus a substantial battery bank — total system cost $1500-4000+.
Takes 120V AC, makes 12V DC for lights/pump/charging.
Takes 12V DC, makes 120V AC for laptops/TVs/microwaves.
Modified sine wave saves money but breaks compatibility with sensitive devices.
Inverter capacity doesn't matter if your battery can't sustain the draw.
What each one actually does
The names describe direction of conversion. Your RV has two electrical systems running in parallel: 120V AC (the kind in your house, used for outlets, microwave, AC unit) and 12V DC (the kind in a car battery, used for lights, fans, water pump, refrigerator controls, slide-out motors). Most of the time you have access to one or the other, not both directly.
When you're plugged into shore power, you have 120V AC at the inlet. But the lights, fans, and water pump want 12V DC. The converter sits between them — it takes 120V AC in, drops the voltage, rectifies it, and outputs 12V DC for the house loads. It also charges your house battery so you have power when you disconnect. The converter is doing this any time you're plugged in.
When you're off shore power (boondocking), you only have what's in the battery: 12V DC. Lights and fans are fine because they're already 12V devices. But if you want to plug in a laptop, run a TV, or use the microwave, those need 120V AC. The inverter takes 12V DC from the battery and steps it up while creating the AC waveform. The output is essentially the same as a wall outlet (assuming pure sine wave), so AC devices work normally.
How to know what you already have
The converter is almost always built in. It's typically a black or grey metal box mounted in the same compartment as the breaker panel, often labeled "WFCO," "Progressive Dynamics," or "Inteli-Power." If you can find the breaker panel, the converter is within arm's reach. Common ratings are 45A, 55A, or 75A — that's the DC output, not AC input.
The inverter is NOT always built in. To check: look for any 120V outlet inside the RV that has a dedicated label (often a different color faceplate, sometimes orange or marked "INV"). If you have one or more outlets that work when shore power is disconnected, you have an inverter feeding those circuits. If every outlet goes dead the moment you unplug from shore, you do not have an inverter installed.
Sizing the inverter (if you decide you need one)
Two questions to answer: what's the biggest single load you need to run, and for how long? The first determines the inverter's continuous wattage rating. The second determines your battery bank requirements (which is usually the actual constraint).
For continuous wattage:
- Laptops, CPAP, LED TVs, phone chargers, fans: 100-300W each. A 1000W inverter handles all of these together comfortably.
- Coffee maker, toaster, blender: 800-1500W each. A 1500-2000W inverter handles these but not while you're also running a TV.
- Small microwave (700W cooking): 1100-1300W input. Needs at least 1500W inverter with surge capacity.
- Full-size microwave (1100W cooking): 1700-2000W input. Needs 2500-3000W inverter.
- Rooftop air conditioner (13,500 BTU): 1500-2200W running, 4000W+ startup surge. Needs a 3000-5000W inverter with high surge tolerance AND a soft-start kit AND a battery bank in the 400+ amp-hour range.
Why battery bank matters more than inverter size
Inverter capacity is the maximum instantaneous draw. Battery bank capacity is how long you can sustain that draw. A 3000W inverter pulled at full power draws roughly 250A from a 12V battery bank. A standard single 100Ah lithium battery delivers 100Ah of usable capacity — meaning it can sustain 250A draw for about 24 minutes before depletion. To run a microwave for the actual 5 minutes you need, this works. To run AC for an evening, it does not.
The corollary: oversizing the inverter doesn't help if the battery bank can't sustain the draw. Most boondocking inverter setups fail because owners bought a 3000W inverter and a single 100Ah battery, expecting hours of microwave or AC use that physics doesn't support. The proper question isn't "how big an inverter" but "how big a battery bank, and how do I recharge it."
2026 cost reference
| Item | Typical 2026 cost | Notes |
|---|---|---|
| 1000W pure sine wave inverter | $140-260 | Renogy, Go Power, Victron. Good for laptop/CPAP/TV. |
| 2000W pure sine wave inverter | $280-480 | Step up if running small microwave or coffee maker. |
| 3000W pure sine wave inverter | $500-900 | For full-size microwave or AC with battery bank to match. |
| Inverter/charger combo unit (2000-3000W) | $900-2200 | Victron MultiPlus, Magnum MS-Series. Includes transfer switch and battery charger in one unit. |
| 100Ah LiFePO4 battery | $300-600 | Standard for moderate off-grid use. |
| 200Ah LiFePO4 battery | $550-1100 | Better for sustained inverter use. |
| 400W solar panel + MPPT controller | $300-650 | For recharging the battery bank off-grid. |
| Professional install (2-3 hour shop labor) | $150-400 | Required if you want it tied into the existing 120V circuits. |
Shop inverters on Amazon
- 1000–1500W inverters — for laptop, CPAP, TV
- 2000W inverters — for small microwave or coffee maker
- 3000W+ inverters — for full-size microwave
- Inverter/charger combos (Victron, Magnum) — for integrated installs
- LiFePO4 batteries — pair with any inverter over 1000W
As an Amazon Associate, FixForge earns from qualifying purchases.
When to stop and call a pro
Wiring an inverter directly into the existing 120V circuit panel via a transfer switch is the boundary where most owners should call in help. Done wrong, you can backfeed shore power into the inverter when reconnecting (which damages the inverter) or create a shock hazard. The DIY-friendly setup is a standalone inverter that you plug devices directly into via its own outlets, with no integration into the RV's existing AC wiring. That setup is safe to install yourself; the integrated transfer-switch setup is not, unless you're experienced with AC wiring.