FixForge › RV › Black Tank Flush Procedure
RV Black Tank Flush: Step-by-Step Procedure
A proper flush after every dump is the single highest-leverage maintenance task for an RV black tank. Skip it and you get sensor failures, odors, and eventually a pyramid of solid waste that requires professional removal. Done right, the whole process takes 10 minutes.
Last Updated: May 2026
Fast answer if you're standing at the dump station
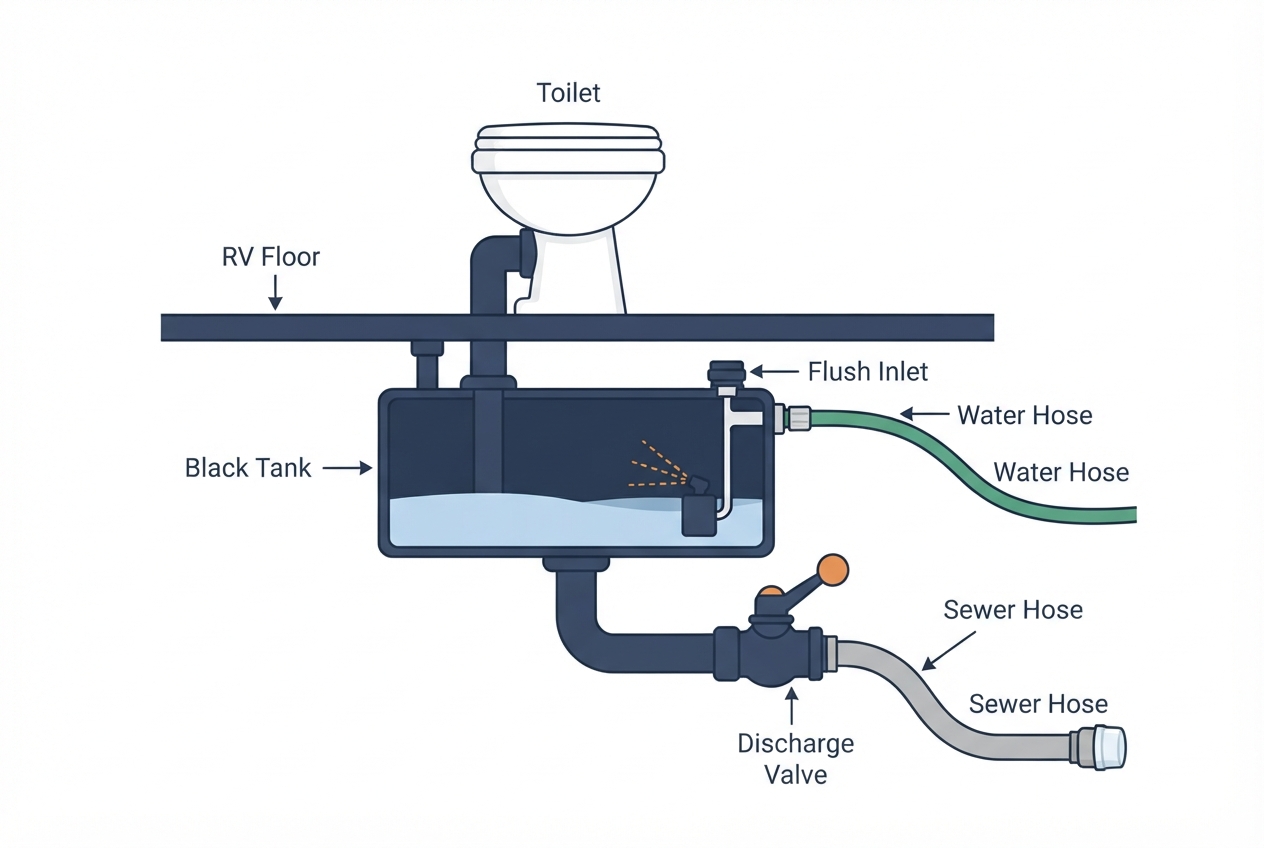
Dump black first, then grey. With both valves closed, connect a freshwater hose to the black tank flush inlet (the one labeled "Tank Flush" — DO NOT use the same hose you connect to your potable water inlet). Open the black valve, run the flush for 5-10 minutes until water runs clear. Close the valve, fill the tank to about 1/3 with fresh water through the toilet, add a tank chemical treatment, and travel with that as a "rolling rinse" until the next dump.
Tank flush hose is separate from drinking water hose and must never be cross-connected.
Always dump black before grey. Grey water then rinses the discharge hose.
Until rinse water runs clear, not just less brown.
Never leave the tank bone-dry. Solids need water to flow on next use.
Why this matters more than RVers think
The single most common chronic black tank problem — sensor failure reading "full" when the tank is empty, persistent odor inside the coach, slow or incomplete discharge — almost always traces back to the same root cause: insufficient flushing combined with operating the tank at less than 2/3 full when dumping. The combination creates conditions where solid waste settles, dries, and forms a buildup pyramid directly below the toilet that water alone won't clear.
Once that pyramid forms, no amount of chemical treatment dissolves it. The solution is either repeated aggressive wand flushing over multiple sessions, or in worst cases, tank removal at a service center for $400-900 in labor. Every owner who has been there will tell you the same thing: ten minutes of flushing at every dump would have prevented it.
What you need before you start
The setup is straightforward but the equipment matters. A few specific items:
- Dedicated tank flush hose — any garden hose works, but mark it clearly so it never gets used for fresh water. $10-20 for a 25-foot length, often sold as a "tank wash hose" in a different color than potable hoses.
- Backflow preventer — if your RV doesn't have one built in, screw a $15 vacuum breaker onto the inlet to prevent any chance of contaminated water siphoning back into the campground water supply when pressure drops.
- Disposable nitrile gloves — cheap, and the difference between a clean process and a long shower later.
- RV-formulated toilet paper — Scott 1000 sheet works (it dissolves quickly), or any RV-specific brand like Camco RV Plus.
- Tank chemical treatment — Happy Camper, Camco TST, or Unique Tank Cleaner. Pre-measured drop-ins are easiest.
The procedure, step by step
- Pull up to the dump station and connect the discharge hose to your black tank valve. Make sure the other end is securely seated in the dump inlet before opening any valve. This is the single most common mistake new RVers make and the most embarrassing one to recover from.
- Open the black tank valve fully. Let it drain completely. You'll hear the flow slow and stop. Wait an extra 30 seconds after it sounds done.
- With the black valve still open, connect your tank flush hose to the dedicated flush inlet on your RV. This is NOT the potable water inlet. It's typically a separate fitting labeled "Tank Flush" or "Black Water Flush."
- Turn on the water and flush for 5 minutes minimum. Watch the discharge. The water will start brown, gradually clear up, and eventually run completely clear. If it never runs clear, you have buildup that needs a wand attack — see the deep flush section below.
- Close the black tank valve. Now open the grey tank valve. The grey water (which is mostly soapy sink and shower water) rinses any residual black tank discharge out of the dump hose. This is why you always dump black first.
- Close the grey valve. Disconnect everything. Cap the discharge hose. Disconnect the flush hose and store it separately from your potable water hose (never coil them together).
- Add 2-3 gallons of fresh water to the black tank through the toilet. Add your chemical treatment. Drive home or to the next site with this "rolling rinse" sloshing inside — it scrubs the tank walls during travel.
The deep flush (do this every 6 months or before storage)
Routine post-dump flushing handles 80% of the buildup. The other 20% — biofilm on the tank floor, deposits around the sensor probes, residue near the discharge valve — needs a more aggressive approach. The standard tool is a tank rinser wand, sometimes called a Swivel Stik or Tornado Tank Rinser. It goes down through the toilet and uses high-pressure spray to attack what the built-in flush spray ring can't reach.
Process: with the black tank empty and the discharge valve closed, fill the tank to about 1/4 with water. Drop in a cup of Calgon water softener (the active ingredient is sodium hexametaphosphate, which dissolves mineral and waste deposits) and a cup of regular liquid laundry detergent. Drive for at least 30 minutes — the agitation matters as much as the chemicals. Then dump and follow the wand flush procedure with the discharge open, working the wand around the tank for 5-10 minutes until rinse water runs completely clear.
2026 cost reference
| Item | Typical 2026 cost | Notes |
|---|---|---|
| Tank flush hose (25 ft, dedicated) | $12-25 | Camco or Valterra brands; color-coded versions easier to keep separate from potable hose |
| Vacuum breaker / backflow preventer | $10-18 | Required by code at many campgrounds; reduces risk of cross-contamination |
| Swivel Stik / tank rinser wand | $25-45 | Camco Swivel Stik is the standard; cheaper imitations work but break sooner |
| RV-formulated toilet paper (8-pack) | $14-22 | Scott 1000 (residential) is a common cheaper substitute that performs comparably |
| Tank treatment (12-month supply) | $25-50 | Happy Camper, Camco TST, Unique Tank Cleaner |
| Professional black tank deep clean | $80-200 | Skip this if you maintain at home; this is for owners who have neglected for a season+ |
| Tank removal & deep clean (severe buildup) | $400-900 | Worst-case service. Includes labor, gaskets, chemicals. |
When to stop and call a pro
Three scenarios where DIY ends and a professional starts. First: persistent odor inside the coach that doesn't respond to chemical treatment and aggressive wand flushing. This typically means a cracked vent stack, a failed roof vent cap, or a seal failure at the toilet base — all repairs that require disassembly. Second: water backing up into the bathroom when you flush. That's a blocked vent, a clogged discharge, or a frozen valve, and forcing it can break things that cost more than the service call. Third: visible cracks in the tank itself, often spotted during a deep flush. Tanks can be repaired with fiberglass but the work is messy and access is poor; most owners replace the tank, which is a service-center job.
The maintenance habit that prevents 80% of black tank problems
Three rules, applied without exception, will keep an RV black tank functional for the life of the coach. One: never operate the tank below 2/3 full when dumping — the solids need volume to flow, and dumping at 1/4 full is the single most common cause of pyramid buildup. Two: flush at every dump, every time, even when you're tired. Ten minutes now or ninety minutes plus a service call later. Three: keep a chemical treatment in the tank between uses. Cheap, easy, and prevents the biofilm that causes both odor and sensor failure.
The RVers who never have black tank problems — and they exist — do these three things on autopilot. The RVers who have constant problems are usually skipping one or all three.